Showing posts with label Spring. Show all posts

Wednesday, April 10, 2013

Homeschool Preschool: Butterflies


Little O just turned two last month, and I've started some homeschool projects with her. Nothing really organized or overly adventurous. I just want to help foster her natural curiosity and desire to learn about everything around her.

We did some winter playdough, winter painting, and Valentine's Day playdough cookies earlier this year.

Since Spring is in the air, I thought it would be fun to do a unit about this season. Then I was inspired by Shaunna over at Fantastic Fun and Learning to focus on butterflies during the next week.


Literacy:
We started the week off by browsing our bookshelf and the library for butterfly-themed books. We read these books all throughout the week.

Books We Read:
The Very Hungry Caterpillar by Eric Carle
Butterfly Colors and Counting by Jerry Pallotta and Shennen Bersani
Caterpillar Spring and Butterfly Summer by Susan Hood and Claudine Gevry
Goodnight, Sweet Butterflies: A Color Dreamland by Dawn Bentley

Math:
Little O is starting to learn to count. Her favorite number is two. And she usually counts by touch each object and repeating two, two, two. It's pretty cute. I kind of like that she's learning the concept of counting individual objects rather than just memorizing the order of the numbers. It makes me feel like the concept is there. Maybe it's just me. :)

I know there are other areas of math for toddlers besides counting. Sometimes I have a hard time coming up with what they are. However, with butterflies, it was easy. Symmetry. Butterflies are the same on both sides.

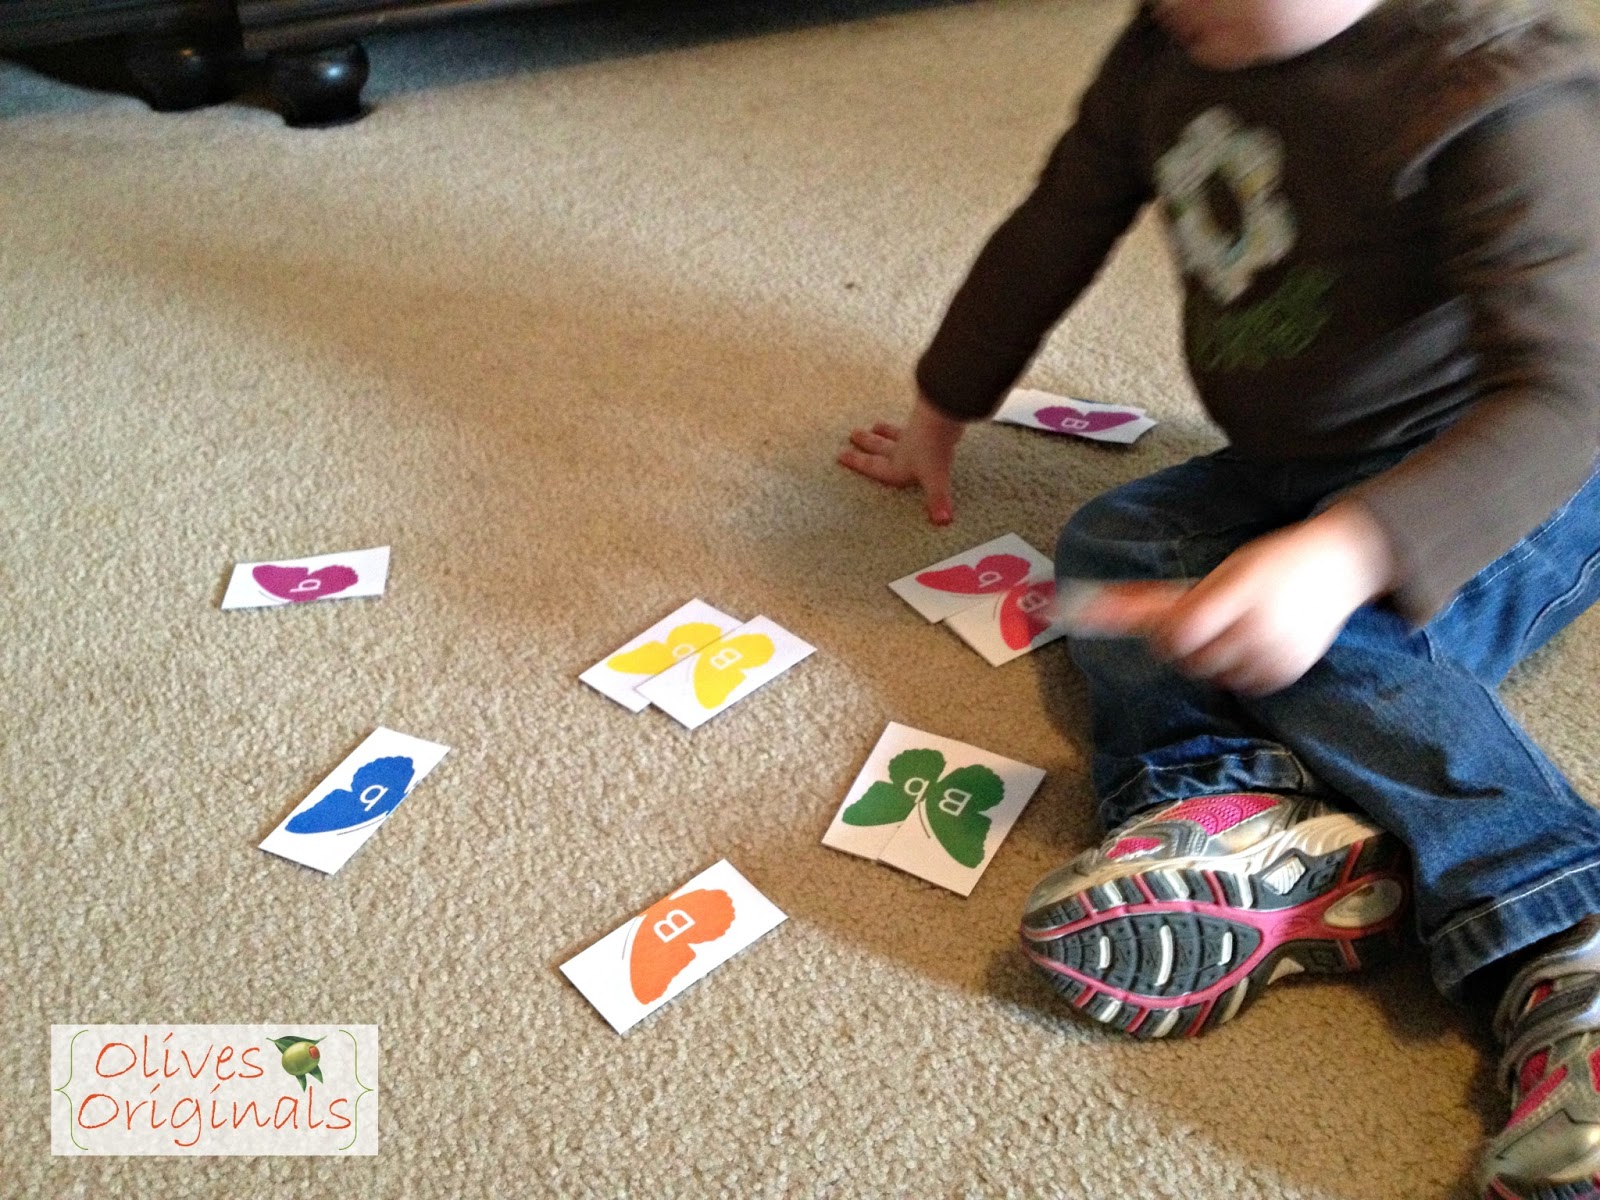
So, I created this Color Matching Butterfly Printable to help Little O learn about symmetry. I cut each butterfly in half, and her job was to match each side to its mate. I added the letters for use at a later time. I think she's still a bit too young for letter recognition.


I also found these fun Butterfly Matching Cards from PreKinders. For Little O, we just matched a few of the butterflies to their twin. Down the road, we'll add more or even play a Memory Game with them.

Art:
We took the idea of symmetry to our artwork this week. We made these Butterfly Blotter Prints.


And, because Little O loves to craft, we had to add in just one more craft project! We took scraps of tissue paper (leftovers from random Christmas and birthday gifts throughout the years) and glued them to a picture of a butterfly. This project helped Little O work her fine motor skills, using her pincer grasp to pick up each piece of tissue paper. And she got to use glue for the first time. Fun!


Outside:
The obvious choice here would be to go on a butterfly hunt outside. However, it's still a bit cold for butterflies in our neck of the woods. I thought about planting seeds for a butterfly garden (and I still might), but I didn't think Little O would make the connections since it would take too long for the butterflies to actually show up.

So instead, we put on some costume wings that I found at the Dollar Tree, and pretended to be butterflies flying around our backyard. Woohoo! Gross motor skills!


We didn't get a chance to take a field trip up to the Peggy Notebaert Nature Museum to check out the Judy Istock Butterfly Haven. We're definitely going there in the next few weeks. (I had no idea it was there, and we get in FREE with our Children's Museum pass). I wish we could have made it there this week, but it just didn't work out.

I hope you enjoyed our butterfly activities! I love comments, so please tell me what you think and what you're doing with your little one.

Butterfly Color Matching Printable


Little O has been fascinated with colors lately. She likes to name the color of everything she sees. "Blue shirt." "Black car." "Green grass." And on and on.

Keeping her interests in mind, I created this Butterfly Color Matching Printable to go with a homeschool preschool unit on butterflies. It's perfect since Spring is making its appearance known around here.

I printed the butterflies out on white card stock and cut out each square. Then I followed the dotted line to cut each butterfly in half. She's a little young for letter recognition, but I plan on using these butterflies in the future when she's ready (and of course adding other letters as well). For now, the goal is for Little O to match each side of the butterfly with its mate.


While we played, we worked on naming each color. I included the colors she knows (red, orange, blue, black, and purple) and a few she doesn't. I also added a variation on blue and purple (aqua and lavender). I thought it would be nice for her to see different shades within the same color family.

During play, I set out three halves at a time. I asked her to name each color. Then, I held up one of the matches, and she placed it with its mate. She did great matching the colors. The most difficult part of the game turned out to be figuring out how to place each card to make it look like a butterfly. This became especially challenging if I switched which side I placed on the floor in the first place.


I hope you and your little one enjoy this activity.

I absolutely love comments, so I'd love to hear from you about how you used this printable!

Monday, April 1, 2013

Easter Sensory Bin

Little O really loves sensory bins. We made one for Easter last week. I dyed rice in four different colors. It's really easy to dye your own rice or noodles for sensory play. I found directions over at Play, Create, Explore.

After making the rice, I added plastic Easter eggs (two different sizes) and some plastic serving spoons. I got both the eggs and the spoons at the Dollar Tree.

Little O just loved playing with this sensory bin. She scooped the rice with spoons and filled some of the eggs. We closed the eggs and shook them to hear the rice rattle around.

Because this is a messy sensory bin (the rice has a tendency to exit the bin) I placed a sheet under the bin. It caught most of the rice, and when she was done playing I just used the sheet to pour the rice back into the bin for later.

I know it's over, but this colored rice could be used for so much more than just Easter. I hope everyone had a nice Easter. We sure did!

Easter

We had a really nice, low-key Easter here. The day before... not so much.

On Saturday we went to our town's Easter egg hunt. We've never been before. It was a madhouse. Never again. A friend described it as Hunger Games Preschool Training Camp. Picture 200 under 2-year-olds running amok trying to gather as many plastic eggs as possible. And the candy inside: Jolly Ranchers. Yes. My 2-year-old just loves to choke on those. Little O found about 4 or 5 eggs, but some of the younger toddlers didn't get any. I'm pretty sure that 4-foot-tall kid isn't 2. Oh well. Live and learn.

 At least she looked cute, right? It was pretty chilly and windy, so she had to wear long sleeves and tights under her Easter dress. This is one of two dresses she had for Easter. Her Nana and Yaya each bought her one.
You really can't tell from our pictures how crowded it was. This is after the hunt was over, and everyone was leaving the field.

Saturday night we dyed eggs with Little O. She enjoyed placing the eggs gently dropping the eggs into the dye and watching it splash all over herself and the kitchen counter. She did not enjoy waiting 5 minutes to see the eggs when they were finished.


On Sunday Nana and Yaya came over for Easter brunch. We had fresh fruit, mimosas, and Monte Cristo Waffle-wiches. Yum-O.

After brunch we went outside for our own Easter egg hunt. Here's where things got a bit dicey for a moment. At this point Little O has had two egg hunts this year: one at school and the one we went to on Saturday. Both used plastic eggs filled with candy. We used our dyed eggs. They also contain something inside. A hard-boiled egg! Little O was a little disappointed when she discovered our eggs didn't open and there wasn't candy inside. Because she's two, things could have gone downhill quickly from here. But luckily, they didn't. She decided that collecting the eggs in her little basket was a lot of fun. And she enjoyed wandering around the yard finding where the Easter Bunny hid them all.


The week leading up to Easter, we read a bunch of books from the library about the Easter Bunny and egg hunts. And the teachers at school did some Easter crafts. I also created an Easter sensory bin, which Little O loved.


I wanted to make some really cute felt Easter bunnies. I started them, but they will remain unfinished until next year.


I hope you all had a great Easter weekend with your families. I'd love to hear how your egg hunts and Easter crafts turned out. Anyone else have unfinished Easter projects that will just have to wait until next year?

Monday, March 25, 2013

Bunny Bunting


I had seen some cute bunny bunting on Pinterest lately, here and here. So I knew I wanted to make one of my own. Plus, Little O is completely obsessed with bunnies right now (goats are still her number one favorite, but bunnies are a close second).

I didn't want to spend a fortune on a Spring mantel. With Easter being so early this year, we won't get to enjoy it for too long. So I sifted through my stash of scrapbook papers to find any that represented Spring and Easter.

I also checked out my Cricut cartridges for a cute bunny silhouette. This one came from the Noah's ABC Animals cartridge. I cut each bunny out at 5.5 inches (the largest my Cricut cuts). For the width of my mantel, I needed 21 bunnies. After cutting them out, I laid them out on the floor of my craft room to decide the order in which to place them on the ribbon.

Once I had them placed the way I wanted them, I hot glued them to the ribbon and attached little white pom poms to the tails. I had these on-hand from a toddler busy box I created for Little O.
I originally planned to drape the bunny bunting on the mantel, but it just didn't look right. Instead I used Tacky adhesive to attach the ribbon flush along the edge of my mantel.
I'm really pleased with how my bunny bunting turned out, but it made me realize that the rest of my mantel looked so naked! I decided I needed to do something about that.

Check out what the finished Spring mantel looks like here.

Friday, March 22, 2013

Spring Mantel

After finishing my Bunny Bunting, I realized just how naked the rest of my mantel looked. I knew I had to do something to make it look finished, but I didn't want to spend a ton of money. The bunny bunting didn't cost me a penny. I had everything I needed to make it on hand already. Score!

So I scoured my craft room for other bits and bobs that I could use to complete my Spring mantel.

I found a really cute Spring Subway Art printable that you can customize by Janet over at Today's Fabulous Finds. I chose Olive and printed it out, but I needed a frame to put it in. I found one I really liked over at Hobby Lobby. It wasn't on sale, but I had a 40% off coupon, so it cost me $11. This is the only thing I purchased for this mantel.
In one of my random craft supply boxes, I found some fake flowers leftover from last year. The pink ones were from Little O's first birthday portraits and the white ones I used on a gift basket for a friend's birthday. I also found small Styrofoam balls from way back when I was in grad school. They've been in that box for five or six years. Time to use them up! I stuck the flowers around the Styrofoam ball to make two pretty pompanders. I used hot glue on a few of the flowers that wouldn't stay put. Then I placed them onto two candle holders I found in my basement. They used to be black, but I spray painted them with some yellow spray paint I had.
The other two things on the mantel are a purple floral bunny my mother-in-law bought for us last Easter and a pink and white tea set I usually keep in my craft room.
And here is the finished product. I'll post a little bit more about the Bunny Bunting on Monday, so check back!

Monday, March 11, 2013

Tutorial: Spring Wreath with Fabric Flowers


I made this wreath last week with the hope of bringing on some warmer weather. I also promised a tutorial. Without further ado... here it is!

You will need:

  • grapevine wreath
  • letter
  • twine
  • an assortment of fabric strips.  2" x 16" (for the small flowers and some of the inner petals on the medium flowers), 3" x 18" (for the medium petals), and 4" x 24" for the large flower. Mine weren't exact. Just close enough.
  • an assortment of buttons
  • hot glue/glue gun
  • floral wire
  • felt
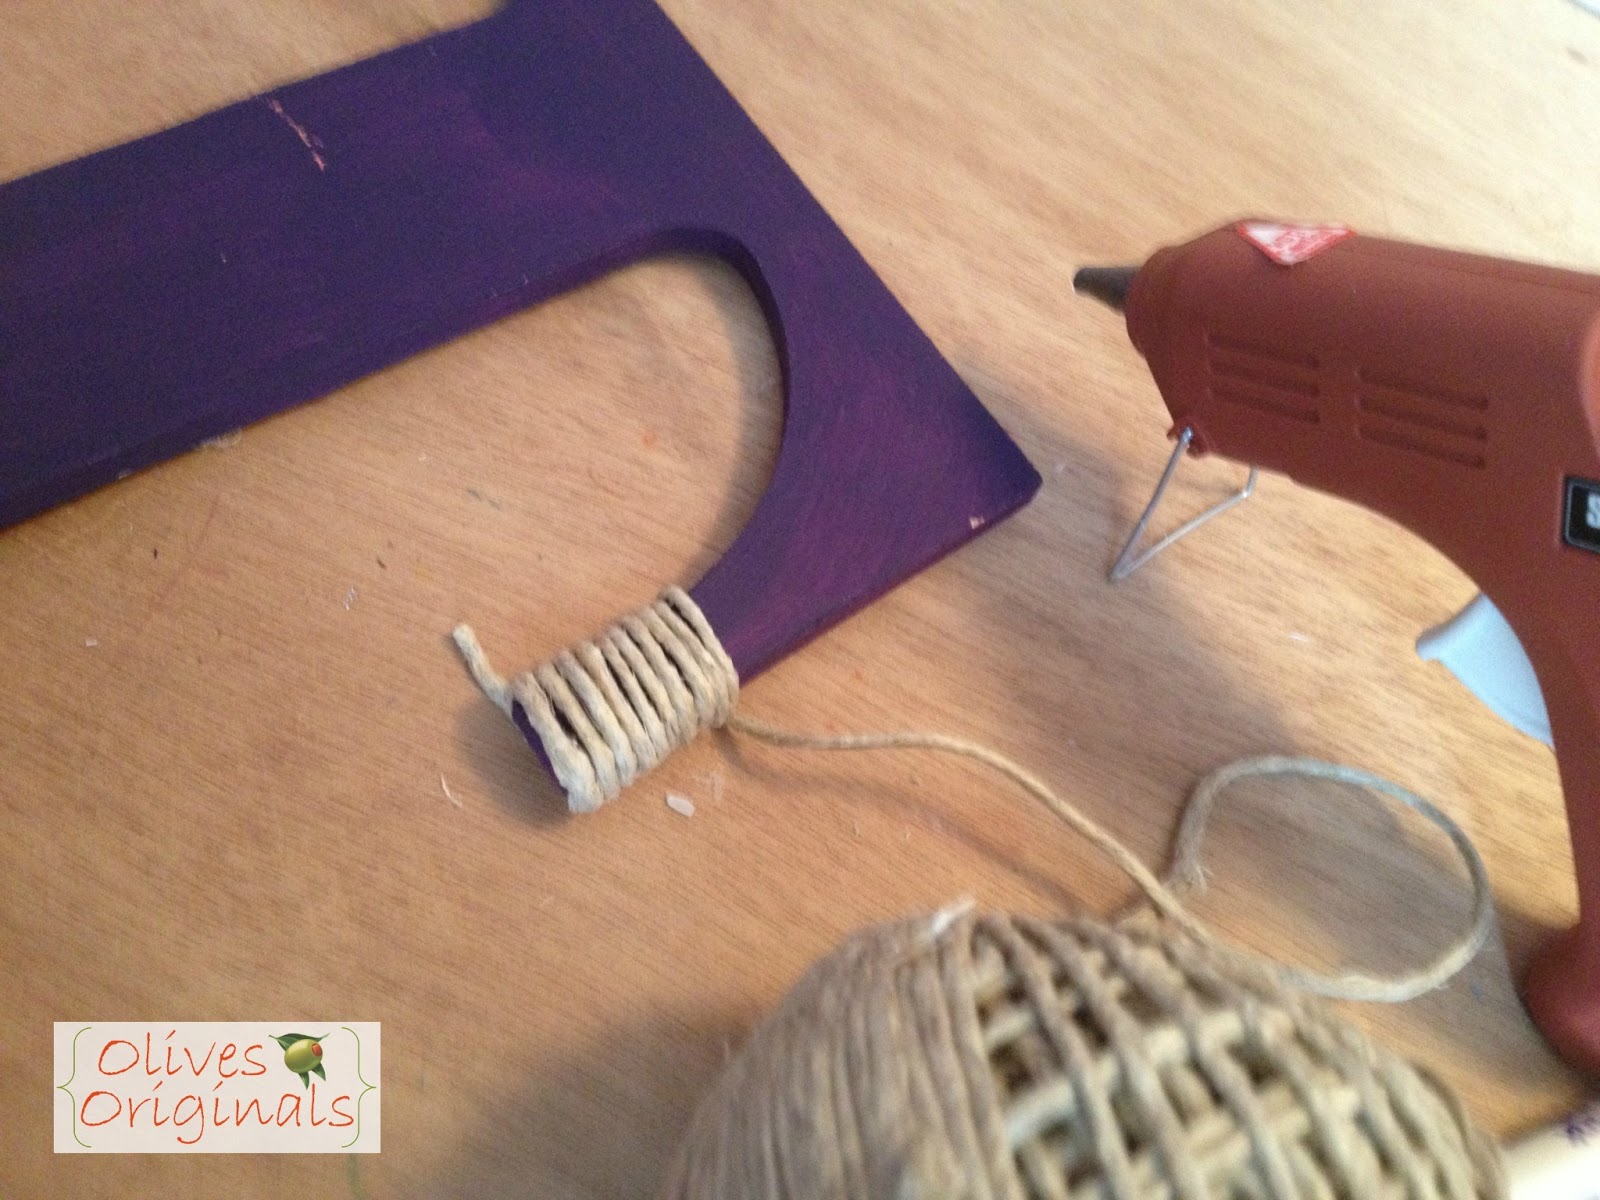
First, I covered the letter with twine. I already had my letter. It was leftover from a monogram decoration from my baby shower. It doesn't matter that it had previously been painted purple, the twine covered it all up anyway.

I put a dab of hot glue on the back of the letter and left a little tail to hold onto while it dried. Then I started wrapping.

And wrapping.

And gluing. About every few inches. Except when I got to the corner areas. See how it is curved on the bottom and straight on the top. That made it a bit tricky to wrap neatly without the twine slipping around. So I glued along both the curved and straight edges for each time I wrapped the twine.

I wrapped it all the way up to the corner. Then I glued it down on the back and trimmed the tails.

Then I wrapped (gluing almost the entire length of the curved and straight edges) the next section.

I repeated this process on the bottom of the letter as well. Then just wrapped up the middle. I didn't use much glue on the middle part. Maybe a drop every few inches.

After I finished the letter, I started cutting and assembling my fabric flowers. I used scraps leftover from quilts I have made, so the fabric didn't cost anything either! Love using up leftovers!

I cut out an assortment of squares from the fabric strips. The inner petals are 1/2" small than the outer petals. So if I cut 2" squares for the inner petals, I cut 2.5" squares for the outer petals. I also cut out 3" and 3.5" squares and 3.5" and 4" squares. Each set of petals takes between 6 and 8 petals (fabric squares) depending on how full you want it to be. I found 6 not to be enough.

I used the lid of a mason jar to trace my first set of circles (I flipped it over and traced the inner ring for the smaller circle). But I found freehand worked better because the flowers looked fluffier if the circles weren't perfect. However, if you're a perfectionist, trace away! You'll have to find something else to trace for the large and small flowers. This is the perfect size for the medium flower.


Once I finished cutting the circles, one at a time, I created the petals. First, fold one circle in half like a taco.

Then fan fold it. Bring one corner up the front and the other up the back.

This was really hard to get a picture of, but when it is finished it will look like a cone from the front. But from the top (where you would put the ice cream if it were really a cone) it looks like an S.


I put a very small dab of hot glue in the tip of the cone on each side to hold it in place. Repeat for each of the circles.

Now it's time to assemble the petals to make a flower. Cut out a piece of felt into a tiny circle. It needs to be big enough to glue the petals onto, but small enough that it doesn't show outside the edges of the flower.

Glue the outer petals on first, slightly overlapping them for fullness. Then glue on the inner petals.
 Finally glue a coordinating button in the middle.


After assembling all the flowers (it took a while!), play with the arrangement on the wreath. And don't forget to make a few flowers to put on the letter. Oh, and it's cute to mix it up by including some flowers that only have one row of petals.

Once you've found an arrangement you like, start gluing the flowers down. Attach the letter using floral wire. I also used hot glue for the letter anywhere it made direct contact with the wreath.

The wreath is the only part I had to buy for this project. With my 40% off coupon for Hobby Lobby, that makes the Grand Total: $3.60! Not bad!


Related Posts Plugin for WordPress, Blogger...