Showing posts with label Paper Crafts. Show all posts

Wednesday, April 10, 2013

Homeschool Preschool: Butterflies


Little O just turned two last month, and I've started some homeschool projects with her. Nothing really organized or overly adventurous. I just want to help foster her natural curiosity and desire to learn about everything around her.

We did some winter playdough, winter painting, and Valentine's Day playdough cookies earlier this year.

Since Spring is in the air, I thought it would be fun to do a unit about this season. Then I was inspired by Shaunna over at Fantastic Fun and Learning to focus on butterflies during the next week.


Literacy:
We started the week off by browsing our bookshelf and the library for butterfly-themed books. We read these books all throughout the week.

Books We Read:
The Very Hungry Caterpillar by Eric Carle
Butterfly Colors and Counting by Jerry Pallotta and Shennen Bersani
Caterpillar Spring and Butterfly Summer by Susan Hood and Claudine Gevry
Goodnight, Sweet Butterflies: A Color Dreamland by Dawn Bentley

Math:
Little O is starting to learn to count. Her favorite number is two. And she usually counts by touch each object and repeating two, two, two. It's pretty cute. I kind of like that she's learning the concept of counting individual objects rather than just memorizing the order of the numbers. It makes me feel like the concept is there. Maybe it's just me. :)

I know there are other areas of math for toddlers besides counting. Sometimes I have a hard time coming up with what they are. However, with butterflies, it was easy. Symmetry. Butterflies are the same on both sides.

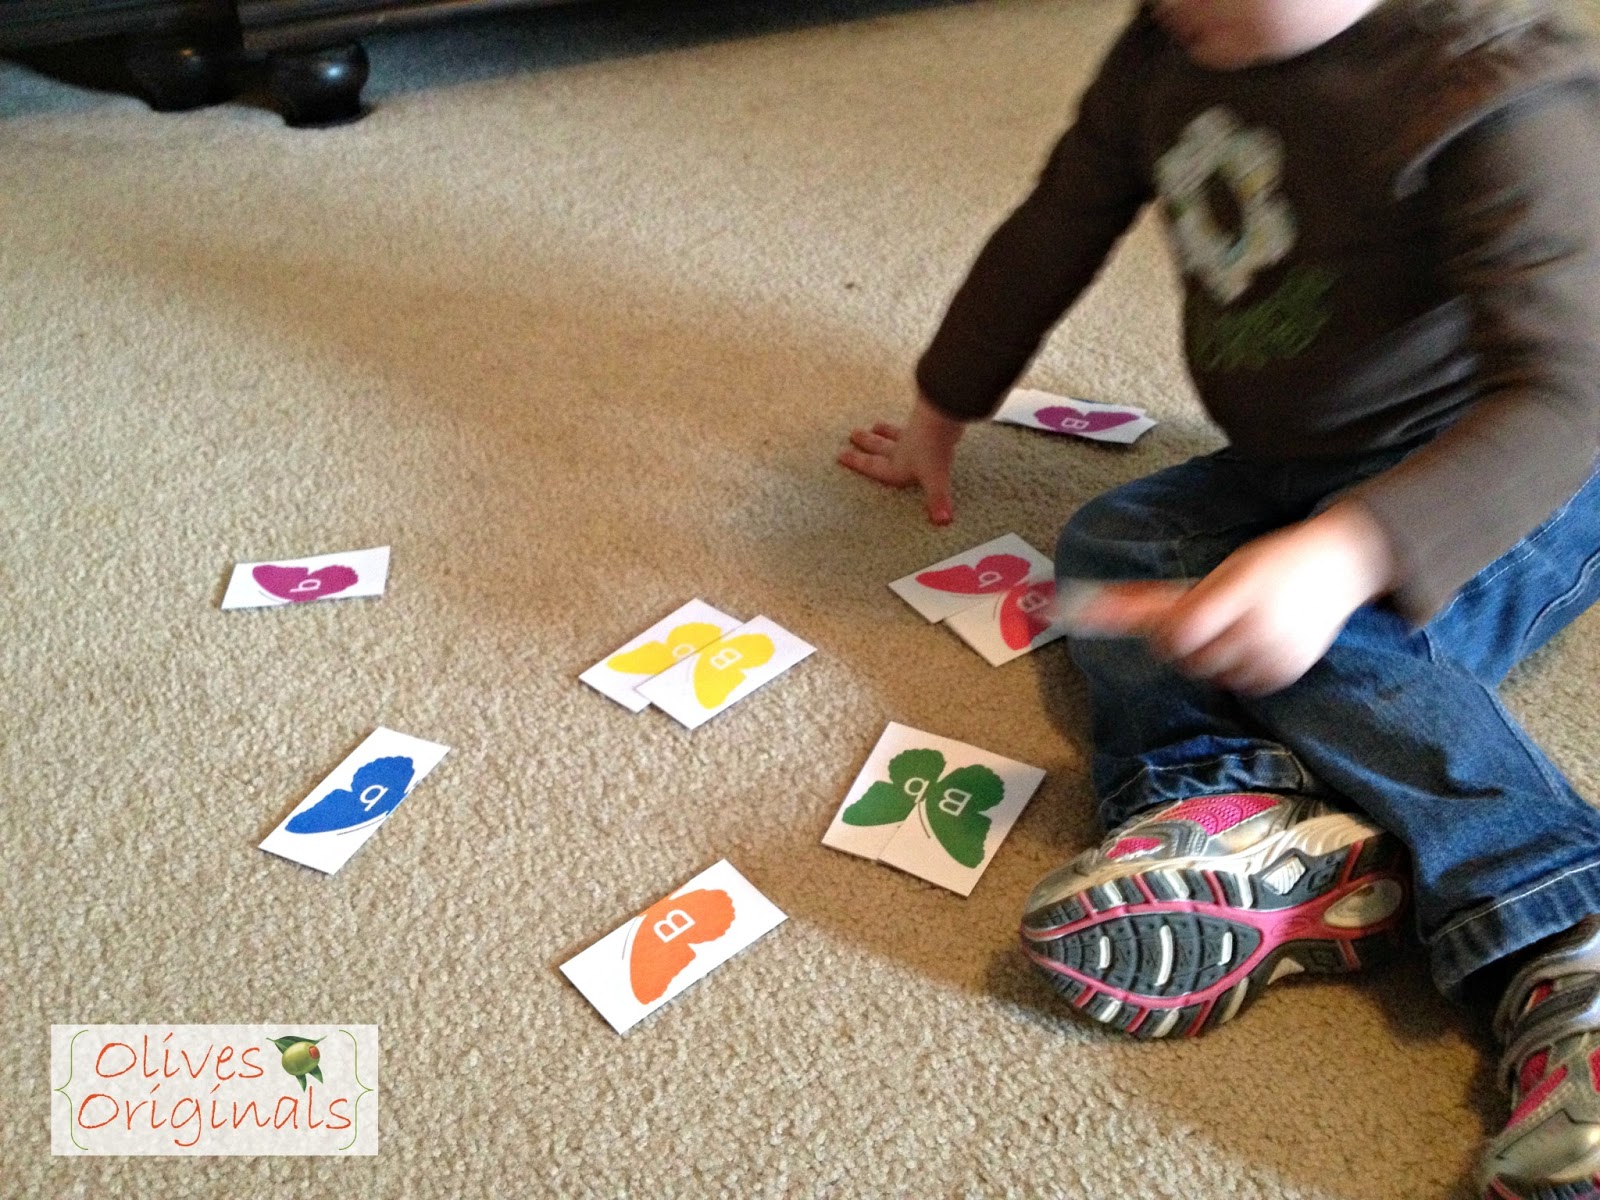
So, I created this Color Matching Butterfly Printable to help Little O learn about symmetry. I cut each butterfly in half, and her job was to match each side to its mate. I added the letters for use at a later time. I think she's still a bit too young for letter recognition.


I also found these fun Butterfly Matching Cards from PreKinders. For Little O, we just matched a few of the butterflies to their twin. Down the road, we'll add more or even play a Memory Game with them.

Art:
We took the idea of symmetry to our artwork this week. We made these Butterfly Blotter Prints.


And, because Little O loves to craft, we had to add in just one more craft project! We took scraps of tissue paper (leftovers from random Christmas and birthday gifts throughout the years) and glued them to a picture of a butterfly. This project helped Little O work her fine motor skills, using her pincer grasp to pick up each piece of tissue paper. And she got to use glue for the first time. Fun!


Outside:
The obvious choice here would be to go on a butterfly hunt outside. However, it's still a bit cold for butterflies in our neck of the woods. I thought about planting seeds for a butterfly garden (and I still might), but I didn't think Little O would make the connections since it would take too long for the butterflies to actually show up.

So instead, we put on some costume wings that I found at the Dollar Tree, and pretended to be butterflies flying around our backyard. Woohoo! Gross motor skills!


We didn't get a chance to take a field trip up to the Peggy Notebaert Nature Museum to check out the Judy Istock Butterfly Haven. We're definitely going there in the next few weeks. (I had no idea it was there, and we get in FREE with our Children's Museum pass). I wish we could have made it there this week, but it just didn't work out.

I hope you enjoyed our butterfly activities! I love comments, so please tell me what you think and what you're doing with your little one.

Butterfly Color Matching Printable


Little O has been fascinated with colors lately. She likes to name the color of everything she sees. "Blue shirt." "Black car." "Green grass." And on and on.

Keeping her interests in mind, I created this Butterfly Color Matching Printable to go with a homeschool preschool unit on butterflies. It's perfect since Spring is making its appearance known around here.

I printed the butterflies out on white card stock and cut out each square. Then I followed the dotted line to cut each butterfly in half. She's a little young for letter recognition, but I plan on using these butterflies in the future when she's ready (and of course adding other letters as well). For now, the goal is for Little O to match each side of the butterfly with its mate.


While we played, we worked on naming each color. I included the colors she knows (red, orange, blue, black, and purple) and a few she doesn't. I also added a variation on blue and purple (aqua and lavender). I thought it would be nice for her to see different shades within the same color family.

During play, I set out three halves at a time. I asked her to name each color. Then, I held up one of the matches, and she placed it with its mate. She did great matching the colors. The most difficult part of the game turned out to be figuring out how to place each card to make it look like a butterfly. This became especially challenging if I switched which side I placed on the floor in the first place.


I hope you and your little one enjoy this activity.

I absolutely love comments, so I'd love to hear from you about how you used this printable!

Monday, March 25, 2013

Bunny Bunting


I had seen some cute bunny bunting on Pinterest lately, here and here. So I knew I wanted to make one of my own. Plus, Little O is completely obsessed with bunnies right now (goats are still her number one favorite, but bunnies are a close second).

I didn't want to spend a fortune on a Spring mantel. With Easter being so early this year, we won't get to enjoy it for too long. So I sifted through my stash of scrapbook papers to find any that represented Spring and Easter.

I also checked out my Cricut cartridges for a cute bunny silhouette. This one came from the Noah's ABC Animals cartridge. I cut each bunny out at 5.5 inches (the largest my Cricut cuts). For the width of my mantel, I needed 21 bunnies. After cutting them out, I laid them out on the floor of my craft room to decide the order in which to place them on the ribbon.

Once I had them placed the way I wanted them, I hot glued them to the ribbon and attached little white pom poms to the tails. I had these on-hand from a toddler busy box I created for Little O.
I originally planned to drape the bunny bunting on the mantel, but it just didn't look right. Instead I used Tacky adhesive to attach the ribbon flush along the edge of my mantel.
I'm really pleased with how my bunny bunting turned out, but it made me realize that the rest of my mantel looked so naked! I decided I needed to do something about that.

Check out what the finished Spring mantel looks like here.

Friday, March 22, 2013

Spring Mantel

After finishing my Bunny Bunting, I realized just how naked the rest of my mantel looked. I knew I had to do something to make it look finished, but I didn't want to spend a ton of money. The bunny bunting didn't cost me a penny. I had everything I needed to make it on hand already. Score!

So I scoured my craft room for other bits and bobs that I could use to complete my Spring mantel.

I found a really cute Spring Subway Art printable that you can customize by Janet over at Today's Fabulous Finds. I chose Olive and printed it out, but I needed a frame to put it in. I found one I really liked over at Hobby Lobby. It wasn't on sale, but I had a 40% off coupon, so it cost me $11. This is the only thing I purchased for this mantel.
In one of my random craft supply boxes, I found some fake flowers leftover from last year. The pink ones were from Little O's first birthday portraits and the white ones I used on a gift basket for a friend's birthday. I also found small Styrofoam balls from way back when I was in grad school. They've been in that box for five or six years. Time to use them up! I stuck the flowers around the Styrofoam ball to make two pretty pompanders. I used hot glue on a few of the flowers that wouldn't stay put. Then I placed them onto two candle holders I found in my basement. They used to be black, but I spray painted them with some yellow spray paint I had.
The other two things on the mantel are a purple floral bunny my mother-in-law bought for us last Easter and a pink and white tea set I usually keep in my craft room.
And here is the finished product. I'll post a little bit more about the Bunny Bunting on Monday, so check back!

Thursday, January 31, 2013

Winter Themed Painting


Little O loved painting snowmen so much the other day that she asked to paint immediately after breakfast this morning. I didn't want to do the exact same painting that we did before because I want to keep it fresh and new for her. Plus, if we do different things with paint, it will keep her occupied for longer.

This time we used blue construction paper and white and blue tempera paint. I didn't water it down at all because I wanted the paint to be opaque.

 While we painted, we talked about winter, snow, and snowmen. I reminded her of the snowmen we painted and the ones we made out of playdough.
 I painted a snowman next to her, and I told her that I made the body using circles. She said he needed eyes (one of her newest words is "eyes"), so I painted on eyes, a nose, and a mouth with blue paint. I added buttons and arms too.
 
Finally, I wanted her to try a different technique with her paintbrush. She spent most of her time brushing on the paint in smooth strokes. I told her I wanted my picture to look like it was snowing. So I started dotting paint on the background. She started doing the same ( her dots are large in the upper left corner). She decided to liked to brush the paint on better, so she went back to that. Hey, at least she tried it, right?

This was a quick, fun painting activity. Little O seemed to really enjoy it. I'm sure we will be busting out the paints again soon. I think this may be the first time we've painted together on colored paper.

Wednesday, January 30, 2013

Painting Over Crayons & Markers

Little O is still feeling a bit under the weather, so I've been scrambling to come up with ideas to keep her quietly engaged. We've already explored playdough, although I think I'll pull that out again later this week as she really enjoyed it. Yesterday I thought a simple coloring activity would be a good thing to try during the witching hour (you know... after nap but before dinner time).

We started with simple printable snowman that I found on Pinterest. I added the letter S and the word Snowman on the page. She wanted to use both crayons and markers. She had Daddy add the eyes to hers. Normally, we don't draw on her paper because we want her to feel empowered to create her own work. However, eyes is one of her newest words, so when she said it, of course we indulged her.

She finished with the crayons and markers rather quickly (I didn't even get any pictures of this portion), but she wasn't quite ready to be done with crafting. I thought it was the perfect opportunity to reintroduce paint to Little O. I couldn't wait to see what she thought of the reactions the crayons and markers had with the paint. We used blue and green tempera paint that I watered down quite a bit. I wanted the crayon and marker to still show.

The crayons created a crayon resist (I'm not sure she really noticed), but the markers started to bleed and smear because they are washable. She definitely noticed this.
After she finished painting her picture, she painted Mommy's and Daddy's as well. She enjoyed painting so much that she asked to do it again today right after breakfast. I'll share the Winter Themed Painting tomorrow.

Thursday, January 24, 2013

Art Party Activities for Toddlers

Little O is going to be 2 in less than a month! WHAT??? Where did the time go? I feel just a few months ago I was planning her 1st Very Hungry Caterpillar birthday party. I can't believe that was a whole year ago.

I showed you the invitations I made for this year's art party last week. I've finalized my plans for the arts and craft projects for the toddlers attending the party, and I created signs for each station.


The plan is to open up all three stations at the same time and let the kids move freely from one to the next at their own pace. Each activity can be child directed with parental support for those who need it.


At the drawing center, I am planning to cover the whole table with white butcher paper and tape it down underneath. Little O has a hard time keeping the paper still when she's coloring, so I thought this would be the best solution, plus, it would keep the table clean. For drawing supplies, I'm providing crayons and markers in assorted colors, stamps and a variety of stamp pads, and stickers.

I'm really excited about the sculpting table. I'm making homemade playdough (since some of Little O's friends still like to experiment by tasting things). This is my favorite no cook playdough recipe from The Imagination Tree. I like to add the color to the water before adding it to the dry ingredients. I found this keeps my hands clean. In addition to the playdough, I'll provide a selection of cookie cutters, rolling pins, and other playdough toys. For an extra element, I'm planning to add pipe cleaners and feathers so the kids can make some interesting creatures.

The last table is the painting table. I was going to make homemade paint, but I haven't found a recipe that I love yet. So I opted for washable tempera paint. I found some really awesome bottles that have glitter mixed in. And of course I'll have the basic primary and secondary colors as well.

Earlier this week, I went shopping for some of the supplies for the stations. I was really excited when I discovered cute little smocks (just the right size for toddlers) at the Dollar Tree. I had been planning to make smocks for each child as the party favor, but there was no way I could make them for $1. So I went ahead and picked up 12. We may not have all 12 kids attend the party, but I'll keep the extras for play dates at our house. While the invitations did say to wear "art clothes," I'm sure most of the parents will be happy to have a little smock for their kiddos to wear.

I'm getting really excited about Little O's art party. She's going to love it!

Friday, January 18, 2013

Valentine's Advent Calendar for Toddlers

Last year I made my husband a Valentine's Day Advent Calendar to count down the days to Valentine's Day. I decorated 14 white craft bags with paper, stickers, stamps, and other crafting supplies. Inside each bag, I included a note about why I love him and some candy. It was great. He thought I was really romantic, and it gave him two whole weeks to come up with something awesome for me!

I saved the bags because I really love how they turned out, and I'd love a chance to reuse them. This year, I'm going to give them to sweet Little O. I won't set them all out at once because at almost two, she isn't old enough to understand waiting to open one each day. I'll just give her a new one every day. And instead of candy, although I think a piece here or there is ok, I'll fill them books about Valentine's Day, supplies for small Valentine's crafts, and other Valentine's Day related activities we can do together as a family.

I will have to make three new bags, as #1, #10, and #14 are definitely geared toward a husband.

Once I get them filled, I'll post what I put in each one and what the new #1, #10, and #14 bags look like.

Have you made any

Thursday, January 17, 2013

Art Party Invitations

I can't believe it. Little O is turning two next month! She's really into arts and crafts right now, so I decided to throw her an art party. It will be at a local community center because I really don't want to have 10 toddlers crafting in my house!

Here are the invitations I made for her party.


I was inspired by some I found on Etsy. I added the little poem at the top, and included all the pertinent information. Except the RSVP date. I can't believe I forgot that!

To make these I designed the palette on my computer with all the text. Then I printed them out four to a page on 8.5x11" brown card stock. I like that the card stock resembles cardboard.


I used scissors to cut out each palette, including the outside notch. I used an exacto knife to cut out the hole. I just free-handed it. Actually, my mom did the first one (pictured below), and then I took over.


After all the invitations were cut out, I used glitter glue pens to make blobs of paint. The one that inspired me used cut out glitter card stock, but I didn't want to cut out all those pieces. Plus, I didn't have glitter card stock. But I did have glitter glue pens left over from my felt Christmas tree. I like the way the glitter glue looks anyway.


I let the glitter glue dry overnight. I was pretty blobby, so I wanted to make sure it was completely dry before gluing the palettes on the background and stuffing them into envelopes.

Once they were dry, I used rubber cement to attach the palettes to some cute polka dot paper I had on hand. I used a piece of red card stock 1/4" larger to frame up the polka dots and give the invitations some much-needed sturdiness.


Here they are. The finished product. I'm really pleased with how they turned out.


I'm not sure which I like better, these or the Hungry Caterpillar invitations I made last year for Little O's first birthday party. What do you think?

Thursday, May 17, 2012

DIY Baby Instruments

Lately, I've been racking my brain for ways to keep my 14-month-old baby entertained during the late afternoons--you know, the witching hour. Basically, between the time she gets up for nap until Daddy gets home from work, she's generally crabby, fussy, grumpy, or just plain bored. I thought that if I could present her with some fun crafts or games in the late afternoon, it might help us survive until Daddy gets home.

Some things I've tried over the last week or so include edible (though not tasty) playdough and finger paint.

I thought we were full on messy crafts (although they were tons of fun), and I decided I wanted to involve some of her other senses. Since this was the last week of Kindermusik until the fall, I thought some homemade musical instruments would be fun.

I was inspired while cleaning out my pantry. Yeah, I know. But I had three almost empty, expired cardboard cylinders. They used to contain grits, bread crumbs, and chow mien noodles.


To make these, you will need:
cardboard cylinders
pretty paper
rubber cement (or any glue you like)
a hot glue gun
an assortment of sound makers (I used little jingle bells, Styrofoam balls, and split peas)

First, I measured the height of each tube. I cut out a piece of scrapbook paper that size, and then I wrapped it around the tube, gluing it down with the rubber cement. I used a thin bead of hot glue to make sure the end of the paper was secure as I didn't want Little O to peel it off.

Once the glue dried, I placed the noisemakers inside. I used hot glue to secure the lids to the tubes to prevent choking hazards.

That's it! Now I am just waiting for her to wake up from her nap to show her the new instruments I made for her.

I was featured on Carrots Are Orange!

150 Kids Co Op Link Up   Come & Play

Thursday, May 10, 2012

Teacher Appreciation Gifts

"Thank You for helping me grow!" 
Today was the last day of Baby O's Morning Out for Moms program. This school year, she's been attending the program for a few hours every Thursday morning. She had two wonderful teachers in her classroom, and I'm sure she's going to miss them over the summer. I am going to miss having a few hours each week dedicated to crafting and sewing. I sure hope nap time gets longer so I can have a few hours in my craft room to myself each week. 45-minute naps are not conducive to creativity.

Baby O (in the middle) with her teachers and a classmate.


Anyway, to show my appreciation for all their work and love O's teacher's have shown her this year, I wanted to make them something special. So of course I scoured Pinterest. There I found links to these other very creative bloggers: Love Grows Wild and Giggles Galore.

Here's what I did:

First, I gathered my supplies and made a list of what I needed. I had craft paint and brushes, chalk, Sharpies, ribbon, a tape measure, scrapbook paper, dowels, and dirt. I needed acrylic spray (to make the paint more durable and to keep the chalk from wiping off), flower pots, flowers, and gift cards.

Once I gathered all of my supplies (and of course, like my mother before me, and my grandmother before her, I waited until the last minute to REALLY gather all my supplies--I didn't have the flowers or gift cards until the day I was going to give them to her teachers), I got down to business.

First, I painted the base of the pots (and the little saucers) black. Then I painted the rims yellow. It took two coats of black and three coats of yellow. In hindsight, I would have painted the yellow first and then the black to get a crisper line. The black kind of showed through the yellow a little bit, but since it was under the rim of the flower pot, I didn't think anyone would notice. The craft store did have chalkboard spray paint, and I thought about using it instead of black craft paint. I decided against it because I didn't intend for the pots to be written on and erased over and over again.


After the paint dried, I taped the measuring tape around the bottom portion of the rim. Using a fine tip Sharpie (the regular-sized one), I marked off each inch mark. I had to fudge the last one because it didn't line up exactly. But I don't think anyone will notice (unless they get out a tape measure and check it). Then I removed the tape measure and marked the half-inch and quarter-inch marks with an extra fine tip Sharpie. In the examples I found online, they marked the pots to the 16th inch, but I liked the clean look of marking to the quarter inch instead. And since I waited until the last minute (6 a.m. on the last day of school), I was running out of time.


Next I used white chalk to write "Thank You for helping me grow" on each pot. I also wrote Baby O's name and the year on the saucer (which will get covered by the pot, but the teachers know it's there and will remember who gave it to them). I used the acrylic spray to set the chalk and make it more durable. Now here is where I ran into a problem: the spray dissolved a little of the chalk, so it didn't look as "chalky". I let the acrylic dry, and then I traced over what I had already written with a second coat of chalk. I sprayed it again, and this time it came out looking like I wanted.


While I wanted for the acrylic to dry, I made paper pinwheels out of scrapbook paper. I found the tutorial here. I didn't use brads. I just hot glued each corner down to the center and hot glued a button on top to hide the glue. I know they don't spin, but I was OK with that. It was more for the look. I just love the school days paper I found. Since my paper wasn't double sided, I glued two pieces (right sides out) together using rubber cement (I didn't have spray adhesive like she used in the tutorial). They turned out great, though. Then I glued each pinwheel to a small dowel using hot glue.


After the acrylic dried, I planted red impatiens in each pot. I tied the gift cards I purchased to the dowel using green grosgrain ribbon. I planted the pinwheels in the pot behind the flowers.

Here are the finished flower pots!

See where I've linked up!
Related Posts Plugin for WordPress, Blogger...